Apache Web Server
Contents
Contents
TL;DR
- Set up Apache on Debian/Ubuntu (or Arch) and get comfortable with how Debian splits its configuration —
apache2.conf,ports.conf, and themods-enabled/,conf-enabled/, andsites-enabled/directories managed with thea2enmod/a2ensitehelpers. - Enable the modules you’ll actually use:
userdirlets local users host their own page in~/public_html(reachable athttps://mywebpage.com/~peter), andcgidruns scripts (Perl, Bash, Python…) from/usr/lib/cgi-bin— plus the fixes for the Internal Server Error it throws first. - CGI scripts run as
www-data, which limits the damage of a bug to that user but does not make CGI safe: a flaw in a script is still remote code execution. Keep scripts root-owned and validate every input. I’d use a framework behind a reverse proxy for anything real. - Finish with free HTTPS from Let’s Encrypt: enable
ssl, install Certbot, and runcertbot --apache --redirectto get your certificates in/etc/letsencrypt/live/and redirect every HTTP request to HTTPS.
Introduction
Apache (httpd) is still one of the most widely deployed web servers on Linux. By the end of this guide you’ll have it installed on Debian/Ubuntu or Arch, understand how Debian splits its configuration, know how to enable the modules you actually need (user directories and CGI), and have a free HTTPS certificate from Let’s Encrypt. It’s aimed at anyone standing up their first Linux web server.
Installation
Update the system first:
# Ubuntu & Debian
sudo apt update -y && sudo apt upgrade -y
# Arch Linux
sudo pacman -Syu
Then install Apache:
# Ubuntu & Debian
sudo apt install apache2 -y
# Arch Linux
sudo pacman -S apache
Configuration
From here on, everything is Debian/Ubuntu. Arch keeps its config in /etc/httpd and has no a2enmod/a2ensite helpers, so paths and commands differ.
Default config from file /etc/apache2/apache2.conf:
# This is the main Apache server configuration file.  It contains the
# configuration directives that give the server its instructions.
# See http://httpd.apache.org/docs/2.4/ for detailed information about
# the directives and /usr/share/doc/apache2/README.Debian about Debian specific
# hints.
#
#
# Summary of how the Apache 2 configuration works in Debian:
# The Apache 2 web server configuration in Debian is quite different to
# upstream's suggested way to configure the web server. This is because Debian's
# default Apache2 installation attempts to make adding and removing modules,
# virtual hosts, and extra configuration directives as flexible as possible, in
# order to make automating the changes and administering the server as easy as
# possible.

# It is split into several files forming the configuration hierarchy outlined
# below, all located in the /etc/apache2/ directory:
#
# /etc/apache2/
# |-- apache2.conf
# | `--  ports.conf
# |-- mods-enabled
# | |-- *.load
# | `-- *.conf
# |-- conf-enabled
# | `-- *.conf
#  `-- sites-enabled
#   `-- *.conf
#
#
# * apache2.conf is the main configuration file (this file). It puts the pieces
#   together by including all remaining configuration files when starting up the
#   web server.
#
# * ports.conf is always included from the main configuration file. It is
#   supposed to determine listening ports for incoming connections which can be
#   customized anytime.
#
# * Configuration files in the mods-enabled/, conf-enabled/ and sites-enabled/
#   directories contain particular configuration snippets which manage modules,
#   global configuration fragments, or virtual host configurations,
#   respectively.
#
#   They are activated by symlinking available configuration files from their
#   respective *-available/ counterparts. These should be managed by using our
#   helpers a2enmod/a2dismod, a2ensite/a2dissite and a2enconf/a2disconf. See
#   their respective man pages for detailed information.
#
# * The binary is called apache2. Due to the use of environment variables, in
#   the default configuration, apache2 needs to be started/stopped with
#   /etc/init.d/apache2 or apache2ctl. Calling /usr/bin/apache2 directly will not
#   work with the default configuration.


# Global configuration
#

#
# ServerRoot: The top of the directory tree under which the server's
# configuration, error, and log files are kept.
#
# NOTE!  If you intend to place this on an NFS (or otherwise network)
# mounted filesystem then please read the Mutex documentation (available
# at <URL:http://httpd.apache.org/docs/2.4/mod/core.html#mutex>);
# you will save yourself a lot of trouble.
#
# Do NOT add a slash at the end of the directory path.
#
#ServerRoot "/etc/apache2"

#
# The accept serialization lock file MUST BE STORED ON A LOCAL DISK.
#
#Mutex file:${APACHE_LOCK_DIR} default

#
# The directory where shm and other runtime files will be stored.
#

DefaultRuntimeDir ${APACHE_RUN_DIR}

#
# PidFile: The file in which the server should record its process
# identification number when it starts.
# This needs to be set in /etc/apache2/envvars
#
PidFile ${APACHE_PID_FILE}

#
# Timeout: The number of seconds before receives and sends time out.
#
Timeout 300

#
# KeepAlive: Whether or not to allow persistent connections (more than
# one request per connection). Set to "Off" to deactivate.
#
KeepAlive On

#
# MaxKeepAliveRequests: The maximum number of requests to allow
# during a persistent connection. Set to 0 to allow an unlimited amount.
# We recommend you leave this number high, for maximum performance.
#
MaxKeepAliveRequests 100

#
# KeepAliveTimeout: Number of seconds to wait for the next request from the
# same client on the same connection.
#
KeepAliveTimeout 5


# These need to be set in /etc/apache2/envvars
User ${APACHE_RUN_USER}
Group ${APACHE_RUN_GROUP}

#
# HostnameLookups: Log the names of clients or just their IP addresses
# e.g., www.apache.org (on) or 204.62.129.132 (off).
# The default is off because it'd be overall better for the net if people
# had to knowingly turn this feature on, since enabling it means that
# each client request will result in AT LEAST one lookup request to the
# nameserver.
#
HostnameLookups Off

# ErrorLog: The location of the error log file.
# If you do not specify an ErrorLog directive within a <VirtualHost>
# container, error messages relating to that virtual host will be
# logged here.  If you *do* define an error logfile for a <VirtualHost>
# container, that host's errors will be logged there and not here.
#
ErrorLog ${APACHE_LOG_DIR}/error.log

#
# LogLevel: Control the severity of messages logged to the error_log.
# Available values: trace8, ..., trace1, debug, info, notice, warn,
# error, crit, alert, emerg.
# It is also possible to configure the log level for particular modules, e.g.
# "LogLevel info ssl:warn"
#
LogLevel warn

# Include module configuration:
IncludeOptional mods-enabled/*.load
IncludeOptional mods-enabled/*.conf

# Include list of ports to listen on
Include ports.conf


# Sets the default security model of the Apache2 HTTPD server. It does
# not allow access to the root filesystem outside of /usr/share and /var/www.
# The former is used by web applications packaged in Debian,
# the latter may be used for local directories served by the web server. If
# your system is serving content from a sub-directory in /srv you must allow
# access here, or in any related virtual host.
<Directory />
 Options FollowSymLinks
 AllowOverride None
 Require all denied
</Directory>

<Directory /usr/share>
 AllowOverride None
 Require all granted
</Directory>

<Directory /var/www/>
 Options Indexes FollowSymLinks
 AllowOverride None
 Require all granted
</Directory>

#<Directory /srv/>
# Options Indexes FollowSymLinks
# AllowOverride None
# Require all granted
#</Directory>


# AccessFileName: The name of the file to look for in each directory
# for additional configuration directives.  See also the AllowOverride
# directive.
#
AccessFileName .htaccess

#
# The following lines prevent .htaccess and .htpasswd files from being
# viewed by Web clients.
#
<FilesMatch "^\.ht">
 Require all denied
</FilesMatch>


#
# The following directives define some format nicknames for use with
# a CustomLog directive.
#
# These deviate from the Common Log Format definitions in that they use %O
# (the actual bytes sent including headers) instead of %b (the size of the
# requested file), because the latter makes it impossible to detect partial
# requests.
#
# Note that the use of %{X-Forwarded-For}i instead of %h is not recommended.
# Use mod_remoteip instead.
#
LogFormat "%v:%p %h %l %u %t \"%r\" %>s %O \"%{Referer}i\" \"%{User-Agent}i\"" vhost_combined
LogFormat "%h %l %u %t \"%r\" %>s %O \"%{Referer}i\" \"%{User-Agent}i\"" combined
LogFormat "%h %l %u %t \"%r\" %>s %O" common
LogFormat "%{Referer}i -> %U" referer
LogFormat "%{User-agent}i" agent

# Include of directories ignores editors' and dpkg's backup files,
# see README.Debian for details.

# Include generic snippets of statements
IncludeOptional conf-enabled/*.conf

# Include the virtual host configurations:
IncludeOptional sites-enabled/*.conf

# vim: syntax=apache ts=4 sw=4 sts=4 sr noet
Basically this file have the config for the directories (such as /var/www/) of the different web pages, other directives such as the LogFormat and includes the configuration of other files like ports.conf (which includes the ports to be listening on) and the conf-enabled/ and sites-enabled/ directories.
For all of the directives, Apache’s page have all of them listed with all of the details.
Modules
To enable a module, we can use a2enmod, which stands for “Apache2 Enable Module”.
There are a lot of modules (when I did this, there were 140).
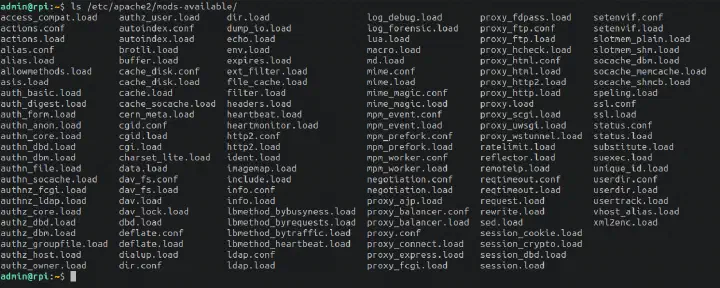
But more can be installed from the apt manager; you can search all of the installable Apache2’s modules with:
apt search '^libapache2-mod-'
User Directories
It allows local users to have their own webpage. They can usually edit it in a folder called public_html in their own user directory. This folder can be modified in the config file of the module.
This website can be accessed from the “master” one. For example: https://mywebpage.com/~peter.
To enable it:
sudo a2enmod userdir
For this to work, the web server user must be able to traverse your home directory (chmod o+x ~). Also note that the default config below allows Indexes, so a public_html without an index.html lists its files.
Example of the config file (/etc/apache2/mods-available/userdir.conf):
admin@rpi:~$ cat /etc/apache2/mods-available/userdir.conf
<IfModule mod_userdir.c>
 UserDir public_html
 UserDir disabled root

 <Directory /home/*/public_html>
  AllowOverride FileInfo AuthConfig Limit Indexes
  Options MultiViews Indexes SymLinksIfOwnerMatch IncludesNoExec
  Require method GET POST OPTIONS
 </Directory>
</IfModule>

# vim: syntax=apache ts=4 sw=4 sts=4 sr noet
CGIs
It allows using scripts (Perl, Bash, Python… you name it) in the webpage. It can be very useful to show data, process data, or even allow logins to the webpage with PAM modules or LDAP modules.
To enable it:
sudo a2enmod cgid
To be able to use any script, first we need to place it in the /usr/lib/cgi-bin directory and its extension must end in .cgi.
Now we can try it by going to our webpage mydomain.com/cgi-bin/myscript.cgi. Except that it throws an Internal Server Error, to solve this we can follow the next steps:
Give it execution permissions
sudo chmod 755 myscript.cgiKeep it owned by root, so the web server user cannot edit it
sudo chown root:root myscript.cgiInsert a header-type in the top of the file to allow the browser know what it’s going to open
#!/usr/bin/perl
print "Content-Type: text/html\n\n"; # <- This line!!!
print "The rest of my script!\n";
Security
CGI is not safe by itself. The www-data user has nologin in passwd, which only blocks interactive logins:
www-data:x:33:33:www-data:/var/www:/usr/sbin/nologin
Code that runs through Apache still executes as www-data. If a script has a bug (shell injection, unsafe input handling), an attacker gets remote code execution as www-data. From there they can read your web root and any config that user can read, write to any directory it owns, and make outbound connections or pivot to other services.
What the setup does give you is a smaller blast radius. Keep the scripts owned by root (mode 755), so a compromised www-data cannot edit them, and validate every input. For anything beyond a toy, consider suexec or containers, or a framework behind a reverse proxy.
Example - Login Form
Consider the next login form (taken from purecss.io):
<form class="pure-form">
    <fieldset>
        <legend>A compact inline form</legend>
        <input type="email" placeholder="Email" />
        <input type="password" placeholder="Password" />
        <label for="default-remember">
            <input type="checkbox" id="default-remember" /> Remember me</label>
        <button type="submit" class="pure-button pure-button-primary">Sign in</button>
    </fieldset>
</form>
We can modify it to allow processing it with CGIs:
<form class="pure-form" action="/cgi-bin/login.cgi" method="Post">
    <fieldset>
        <legend>A compact inline form</legend>
        <input name="email" type="email" placeholder="Email" />
        <input name="password" type="password" placeholder="Password" />
        <label for="default-remember">
            <input type="checkbox" id="default-remember" /> Remember me</label>
        <button type="submit" class="pure-button pure-button-primary">Sign in</button>
    </fieldset>
</form>
And then, the idea is to use PAM from the login.cgi script and redirect depending on login success. Only serve this form over HTTPS (see the next section), or the password travels in clear text.
Caution: I have not tested this, and as written it will not work.
/etc/shadowis readable only byroot(and theshadowgroup), but the CGI runs aswww-data, so a PAM module such as Authen::SimplePam cannot verify other users’ passwords. The usual workarounds are to addwww-datato theshadowgroup, which is a bad idea, or to write a small privileged helper, which is easy to get wrong. For a real login, use your framework’s auth with hashed passwords in a database, and don’t expose system accounts to the web.
HTTPS - Let’s Encrypt
Enabling HTTPS on our webpage allows users to connect securely as the packets transmitted between both stations are encrypted. Also, it’s a relevant factor in the SEO aspect because search engines such as Google use HTTPS as a (small) ranking signal.
For the SSL certificate, we can build our own with OpenSSL, but since it’s not trusted by browsers (Chrome, Firefox, Safari, etc.) we’ll create one free certificate with Let’s Encrypt.
Enable SSL
sudo a2enmod sslInstall Certbot
sudo apt update && sudo apt install certbot python3-certbot-apache -yRun Certbot
sudo certbot --apache --redirect -d mydomain.com -d www.mydomain.com -m admin@mydomain.com --agree-tos--redirect: Redirects every HTTP request to HTTPS-d mydomain.com -d www.mydomain.com: We can use the same certificate for multiple domains, but only up to 100 domains.Certbot may ask whether to share your email with the EFF. That is optional; answer
YorN.Done! Certbot needs ports 80 and 443 reachable from the internet for the validation. Check that automatic renewal works with
sudo certbot renew --dry-run.
Note (2026): Let’s Encrypt and the Certbot docs now recommend installing Certbot with
snaporpipon Ubuntu. Thepython3-certbot-apachepackage above still works on Debian, but it may be older.
Our certificate files will be located at:
root@proventure:~# ls /etc/letsencrypt/live/mydomain.com/
cert.pem  chain.pem  fullchain.pem  privkey.pem  README